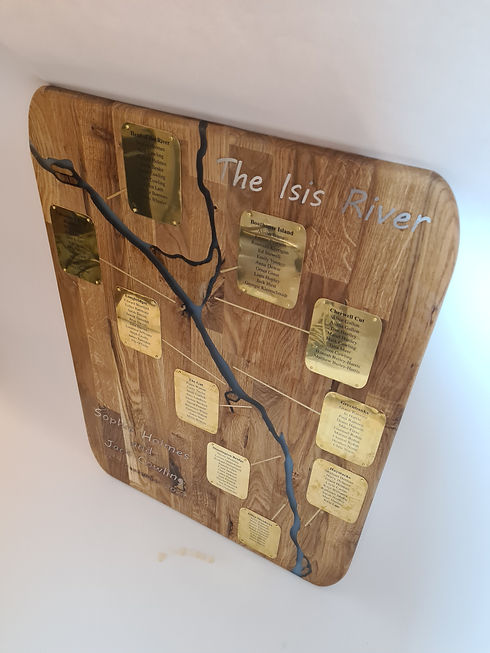
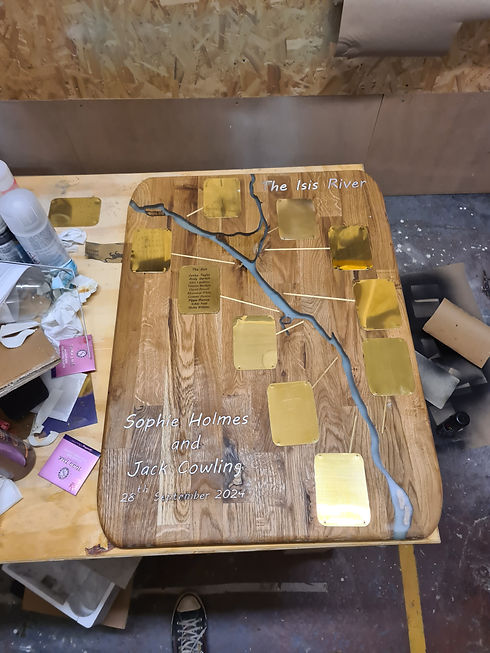
Wedding Seating Display
A board displaying the seating arrangements for a wedding based on the Isis River
Overview
Two close friends came to me and asked if I could make a display board for their wedding. Every table was going to be named after a part of the river Isis where they met.

Using the map as a guide I formed a design using Inkscape. I then transfered that into Fusion 360 where I produced a first draft render. After discussing the design with the couple and some creative friends, I changed the board to a more rounded shape to echo the natural shape of the river. I also added the couple's names and wedding date.
The base was an oak worktop from B&Q. I would have liked to have produced the base myself from oak boards but the timeframe wouldn't allow it. I feel that the fact it's a worktop shows through in the final product, a panel made from fewer constituent parts would have given it a cleaner feel.
I cut off a strip at the bottom and performed some test CNC cuts to find the appropriate speeds and feeds before starting work on the full board. I also cut the islands during this stage

Once I was satified with my speeds and feeds I moved to the full board. I produced a 7 operation milling plan in Fusion 360. This may have been overly complicated but I felt it would give the best results.
1) facing
2) 2mm straight mill to cut the inlay for the brass strips
3) 6mm spiral mill to cut out the bulk of the river leaving 1mm edge
4) 3.175mm compression mill to cut out the smaller areas of the river the 6mm mill could not reach
5) 3.175mm compression mill to remove the 1mm edge in 5 passes to leave a clean edge.
6) 4mm 30 degree engrave mill for the tiltes
7) 6mm spiral mill to cut out the edge
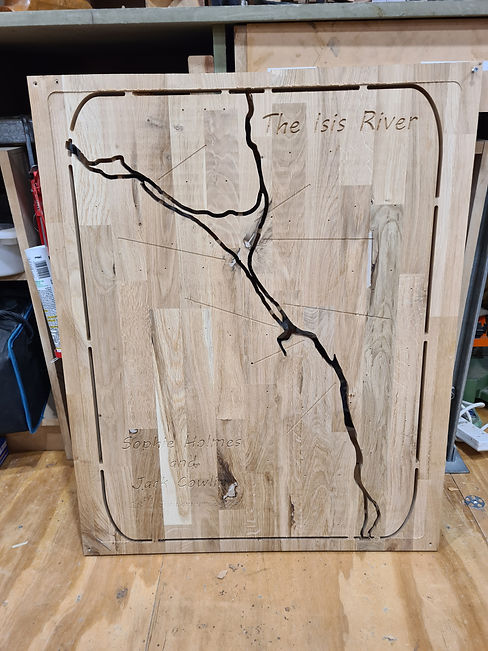
My CNC plan left a 2cm board that would never be touched by any mills allowing me to screw the board to the CNC bed to minimise the chance of it moving.
I removed all the internal tabs with a keyhole saw and sanding dremel attachment. I now needed to attach a floor to the board to hold the resin. I surrounded the river with a bead of silicone (protecting the wood with blue painters tape incase the silicone caused any discolouration) and then placed waxed paper over the silicone forming a water tight seal.
Once this had cured I mixed a small clear base layer of resin roughhly 2mm deep. This acts to form a strong base that will hold far tighter than the silicone when the deeper pour is added. I brushed the resin onto the internal sides to seal them and stop any air degassing and forming bubbles later. All resin was degassed in a vacuum chamber before being added to the piece.


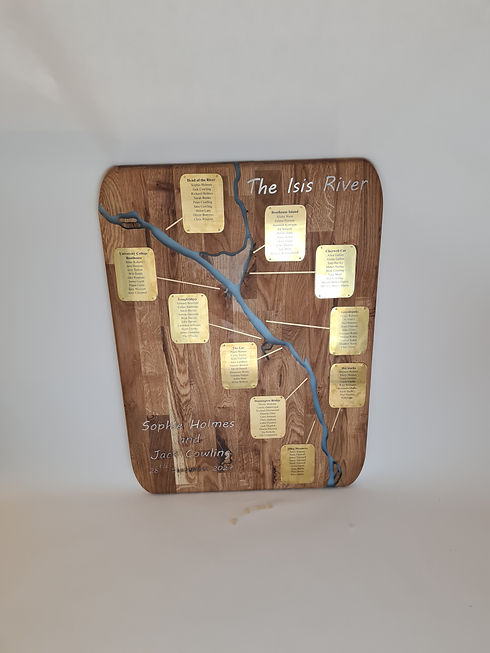
Once the resin had reached it's semi cured B stage I went ahead with the main body pour. The CAD software told me this would be 410 mL so I mixed 500 mL or resin and poured it over. I watched it for a few hours with a small blow torch to pop any bubbles, there were quite a few on the north side of the main island, I guess I must have missed a section when I was sealing it. The resin did not turn out as blue as my test samples. My best guesses for why this happened are either that I was more cautious with my drop counting in the full piece resulting in smaller drops or becuase I poured the resin quite a bit deeper than intended (product datasheet said 5mm max depth and I poured 15mm) this caused the resin to overheat and become discoloured.
The islands were weighted down to stop them floating to the surface but this caused the islands to be lower than the main board and are under 1mm of resin in the final product. If I do this again I will pour the resin with the board upside down so the island stick proud at the front and can then be sanded flat.
There was a thin final clear layer of resin to fill in some low spots and then I left it for 4 days to fully cure.
I used an electric planar on both sides and then sanded it smooth with increasing grit sand paper. I then cut the board free of the frame which had been acting as a barrier for the resin and rounded the edges of the board with a 10mm roundover router bit.


For the titles I was planning to pour molten pewter into the ingravings. I had done several successful tests of this but when it cam to the final piece I was unable to recreate this reliably. I spent several hours trying to refine my technique and was close to resorting to my back up plan of using a black resin. Happily, after a bit of research, I found a technique online that involved lining the carve with copper tape, fluxing it and then placing solder in.
I then sanded the solder flush. This was mostly very successful with the exception of 'September' which had the thinnest engraving and several parts came loose. I had to pick every bit out, sand back the burn bits and start over more carefully and slowly. It worked better but it is clearly less readable in the finial product and one of my biggest areas of frustration. I would use a steeper angle mill, maybe 20* and perhaps in combination with a straight mill If I were to do this again, that would give the solder more wall angle to adheare to and have a better chance of staying in.


The brass strips were filed to shape and adheared in place with CA glue. Some glue got on the surface so I later sanded it down and left te brass with a machined finish that caught the light in a pleasing way.
I was initialling planning to etch the brass plaques using ferric chloride. My plan was baesd on a technique I had read online where I would coat the brass in paint then use a laser cutter to remove the paint in certain areas leaving the copper exposed. Placing this in the ferric chloride would then etch away at the exposed areas and reveal the names. I could then fill the indented names with paint and leave a very durable plaque. However I could not get the brass to etch successfully, I belive this was because the laser was leaving some form of residue or oxide layer on the copper that also acted as a mask and stopped the etchant working as intended.
Instead of etching I moved to a laser marking powder which was very effective although I still have questions about its long term durability. I cut the plaques out using a nibbler attachment on my drill and leaving a 2mm border, I then sanded the remaining brass down on a belt sander and filed the edges smooth.

I gave the board several coats of danish oil and screwed all the plaques in place with brass screws.
Finally I signed the back and shipped it to the clients.
There are many areas I plan to change or improve if I make another.
1) I would look into other finishing methods for the wood instead of just an oil, I believe the a more gloss finish would make the result more durable and aesthetically pleasing.
2) I would add more blue pigment to the resin, perhaps several shdes of resin to make a more textured, river-like pattern.
3) I would etch the brass plaques instead of marking them, this would increase durablility and finishing options. I am concerned that the current brass plaques will tarnish over time.
4) I would use a larger font for the titles , the small font was very challenging to fill with solder and I was unsatisfied with the burnt result.
5) I would make the pockets engraves for the titles deeper with stepper walls
6) I would use a differnt wood lay-up with fewer boards, I would also make it thinnner than this 2cm.
7) I would look to get the plaques manufactued externally to improve accuracy and reduce manufactureing time, alternatively I would investigate using a band saw.
8) I would be interested in looking into embedding LED strip lighting into the underside of the river, it looks great when backlit.
While there are many areas I would like to improve I learnt a huge amount through this project and given te limited time and budget available I am very happy with the results. It took rounghly 90 work hours to complete and £400 in materials and tooling.
The clients seemed thrilled with the end product and it is something they are likely to keep for many years.